If you've used WordPress even once in your life, you're probably no stranger to the power of plugins. However, by using plugins on your website, you are Your WordPress plugin are very different things. If you are interested in WordPress Plugin development and have taken your first step on this path, the structures and functions may seem a bit complicated at first. Before you dive into plugin coding WordPress Plugin Development Guidewe encourage you to take a look at our

Gaining a solid understanding of how plugins work and how they are built is the first important step. Once you have the basics down, it should be fairly easy to create and install your own simple plugins.
In this article, you will find a list of essential items and how they work together, including WordPress plugin the basics of plugin development. We'll also guide you through our six-step WordPress plugin development tutorial and offer some tips and best practices for creating your first plugin.
Introduction to WordPress Plugin Development
WordPress plugins WordPress offers many powerful ways to enhance the functionality of your website. Without editing any code directly, you can extend your site's features beyond those available on the core WordPress platform.
In the WordPress Plugin Directory why, despite the thousands of plugins available your plugin Creating your own plugins allows you to add customized functionality to your website that may not be available in existing plugins.
Creating your own plugin is one of the best ways to add unique functionality to your site. #WordPress
Additionally, plugin development is relatively easy to learn and offers more flexibility and cost efficiency than hiring a developer to make custom additions to your site. It's also a great way to get an in-depth understanding of how the backend part of WordPress works.
At a basic level, a plugin consists of one or more functions and files written in PHP, WordPress' primary coding language. It also contains four core elements, which we will discuss in detail in the next section: actions, filters, shortcodes and widgets.
You don't need to be an experienced programmer to develop your own WordPress plugins. However, if you have basic knowledge and familiarity with PHP, CSS and HTML, this process will be significantly easier. The good news is, to help you learn these basic languages There are many online tutorials that can help.
How WordPress Plugins Work
To develop your own plugin, it is essential to first understand how the underlying systems work. Plugins, First of all a way for one piece of code to interact ('bind') with another using hooks works . WordPress has two types of hooks: actions and filters. We'll cover them in more detail below, along with two other elements commonly used in plugin development.
Actions
A WordPress action refers to a specific activity that will happen at a specific time. With Action you can add or change the functionality of your plugin.
A WordPress action' for example, is save_post . Actions do_action is defined by the function . They require $ label parameter (action name) and in some cases $ args (actions can be expanded with additional arguments).
WordPress core dozens of predefined actions comes bundled together. However, you can also create it yourself. Either way, when developing your WordPress plugin, you'll need to set the values of your connected function to do_action you will use it. ADD_ACTION function will then be used to bind this function to a specific action.
Filters
WordPress filters are hooks that accept a single variable or a set of variables and send them back once they have been modified. In a nutshell, filters allow you to modify the content displayed to users.
WordPress filters, apply_filters function and are defined inside this function. They require $ tag (filter name) and The value of $ arguments with the option to use (a filtered value or variable), There's $ for extra function values.
Apply_filters hook to create your own filter. To run it later add_filter function. This allows you to bind a specific function to the filter, so you can modify the variable and return it.
Shortcode
Simply put , shortcode is a user-facing website that gives users a quick and easy way to create and show custom functionality to their site's visitors. facing code bits. Shortcodes can be embedded in posts and pages through the editor, in menus and widgets, etc.
Many plugins make use of shortcodes. To create your own shortcode add_shortcode function. The name of your shortcode will be the first variable and the second variable will be the output function. The output function consists of three values: attributes, content and name.
Widgets
Another way to enable plugin functionality through a simple interface WordPress widgets is to use it. WP_Widget class you can create a widget by expanding it. WordPress uses an object-oriented design approach to widgets, which means that functions and values are stored in a single entity of a class.
Before you start WordPress plugin development, we recommend reading these topics to better understand how plugins work. Here are some useful WordPress plugin development tools and resources you can use:
6-Step WordPress Plugin Development Tutorial
Now that we've looked at the elements that make up a plugin, it's time to talk about how you can create a plugin. Before adding a new plugin to your website or editing any files, it's important to first remember a test environment or test site. This allows you to try out the WordPress Plugin you have developed safely without the risk of breaking your live site.
Always test changes to your website (including new plugins) on a staging site first. #WordPress
Other than that, let's take a look at the six steps in our WordPress plugin development tutorial:
- Select a Plugin Name
- Create your Plugin Folder and PHP File
- Add Your File Title
- Program Your Plugin and Add Functionality
- Compress Your Plugin Folder
- Activate the Plugin on Your WordPress Site
Step 1: Choose a Plugin Name
WordPress plugin The first step in development is to come up with an official name for your plugin. You should choose a name that is relevant to what the plugin does, but also unique.
Make sure there are no other plugins with the name you intend to use to check the WordPress Plugin Directory for and doing a few Google searches would be a good step. Remember that your official plugin name will be the name you use for the plugin folder and PHP file.
You can also use a shortened version of the plugin's name as an example to avoid name conflicts (more on that later). Therefore, choosing a name that can be easily shortened to create a unique identifier will make your job easier in the future.
Step 2: Create your Plugin Folder and PHP File
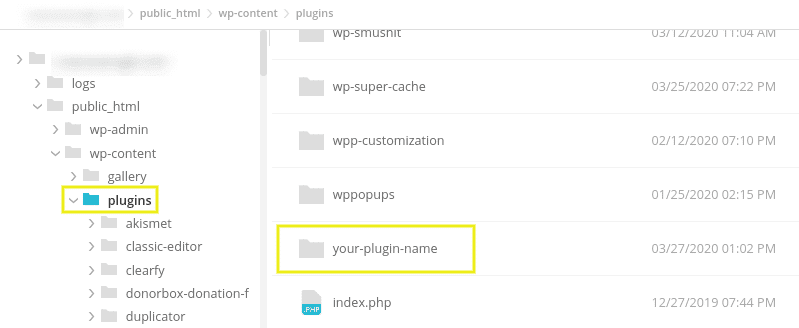
First of all, your plugin needs a place to run. So, once you have a name for your plugin, the next step is to create a folder for it.
Your WordPress files wp-content / plugins folder. Create a new folder and name it using the name of the plugin, using hyphens to separate words (i.e. "your-plugin-name"):

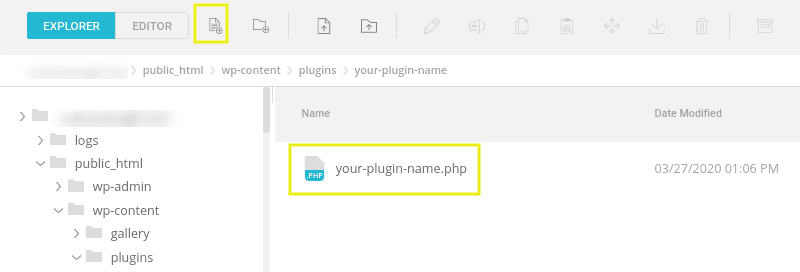
Once you have set up your plugin folder, the next step is to create a PHP file in it. It is best to follow the same naming convention (for example, "your-plugin-name.php"):

Depending on how complex your plugin will be, it can contain a single PHP file or multiple files. For example, you can have separate files for js, CSS, etc.
Step 3: Add Your File Title
Once you have created your main plugin file, it's time to add the file title. Essentially, this is a PHP block comment containing metadata about your plugin.
Add the following code inside the file:
/**

* Plugin Name: Your Plugin Name -> (Your Plugin Name)

* Plugin URI: http://yourdomain.com -> (Plugin URL)

* Description: -> (Your Plugin Description)

* Version: 1.0.0

* Author: Your Name -> (Company or person who developed the plugin)

* Author URI: http://yourdomain.com -> (URL of the company or person who developed the plugin)

* License: GPL2 -> (Your License Type)

*/
Of course, you will want to replace the above information with details about your plugin. Also, if you have more than one PHP file in your plugin directory, make sure you only include this title in one of them (specifically index.php).
This title should contain at least the name of your plugin. However, you can also use this field to add details about the author, license, etc.
Save your changes when you're done. Your plugin must be added to your WordPress site. To make sure this is the case, go to your WordPress admin panel Add-ons Go away

Step 4: Program Your Plugin to Add Functionality
At this point, you have created the basic framework for your plugin. However, it obviously can't do anything yet 🙂 . For that, you will need to program your plugin using the elements we mentioned earlier in this post.
Plugin There are many ways to create and use them. Unfortunately, there is no single in the article is too long a topic to cover. However, if you need help writing the code for your plugin, you can use , WordPress Codex as a guide we strongly recommend that you use it.
Remember to create different files for your plugin. For example, you can create separate files for CSS, JavaScript, images, etc. While this is not a requirement, it can be incredibly helpful for organizational purposes, especially if your plugin has multiple functions. If you end up with multiple files, you will need to add them to a compressed folder before uploading them to your site. We use the zip option for this.
Step 5: Compress Your Plugin Folder
As we have already seen, WordPress plugins directory, the plugin will be automatically added to your WordPress site. However, when writing your PHP file and plugin code, you may also be using a text or code editor.
Before you install your plugin on your WordPress site, .zip format. You can therefore compress the plugin folder when you are done adding all the code you want to include. To do this, you usually right-click on the folder and select Squeeze you can choose .
Step 6: Activate and Run the Plugin on Your WordPress Site
Once you've created the first draft of your plugin, you can finally get to the fun part: Using it on your WordPress site! If you haven't added it to your WordPress installation yet, you can add the folder plugins directory (see Step 2 above for more details).
The plugin can be installed on a .zip folder, Plugins> Add New> Install Plugin> Choose File and add it to your WordPress dashboard:

If the plugin is already in your WordPress directory , Add-ons screen and go to the Activate link. You are then ready to test your plugin and make changes and improvements as needed.
Bonus Gurmehub WordPress Plugin Development Services
Gurmehub offers custom plugin development services that will take your WordPress site to the top. From e-commerce to subscription systems, from custom form builders to integration solutions, we have a wide range that covers everything you need. Whether you're looking to increase product sales, improve user experience, or secure your site, Gurmehub's team of experts is ready to deliver the custom WordPress solutions your business needs. Work with us to maximize your site's performance, increase your visitor traffic and strengthen your digital presence. Take your WordPress site to the next level with Gurmehub and stay one step ahead of your competitors.


